Managing Email Templates
Viewing the Email Templates List
To Use the Email Templates List:
-
Open the Admin | Manage Email Template screen:
-
Mouse-over the Admin menu tab to display the Admin menu and then click the menu’s Manage Email Template item.
-
OR
-
Open the Admin screen by clicking the Admin menu tab and then click the screen’s Manage Email Template link.
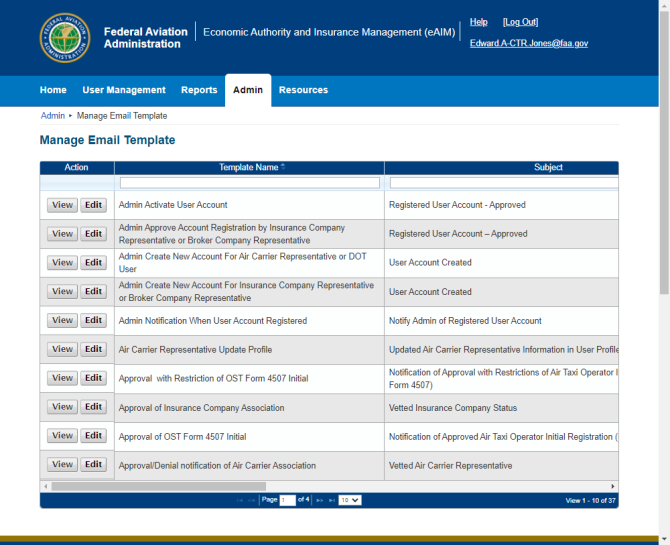
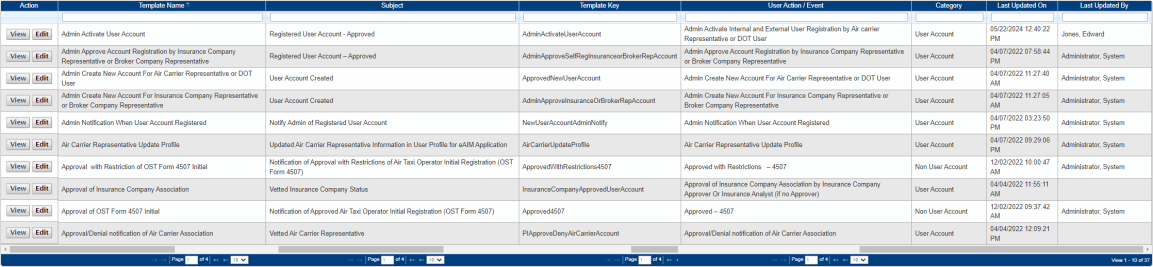
The system displays the Manage Email Template screen and Email Templates List. The Email Templates List is a table-like grid with each grid row representing an eAIM email template. The columns include (from left to right): Action, Template Name, Subject, Template Key, User Action/Event, Category, Last Updated On, and Last Updated By. For each row, the Action column displays the View and Edit command buttons, and the Action column remains in view while the user uses the grid’s horizontal scroll bar to control the grid’s display area to display the grid columns (hidden to the right by the width of the display area).
You can sort the grid for a specific column by clicking the column heading. You can use the search fields in the grid’s first row to search (and also filter) the grid contents. The first grid row provides search fields allowing you to enter field-specific search criteria to filter the grid and so reduce the rows to include only data matching the entered characters. You can use the Page field to go to a specific page of the list and you can use the Display Rows list box to control the number of rows displayed in the grid’s display viewing area. Standard eAIM Page Navigation controls, located at the bottom of the list, and the vertical scroll bar, located along the list’s right side, allows the user to move through the list. Refer to the topic “List Grid Navigation and Search Features” for more information.
-
Use the screen’s Email Templates List grid to review the email templates or locate the template that you want to work with.
The grid’s scroll bars and page controls allow you to navigate through the list. When you use the horizontal scroll bar, the Action column stays in view and the remaining columns are scrolled into view from right to left.
-
To start viewing or editing an email template, select the template’s row within the Email Templates List.
Once selected, the grid row containing the selected account is highlighted, after which you can perform data management functions for the template.
The grid’s scroll bars and page controls allow you to navigate through the list. When you use the horizontal scroll bar, the Action and Insurance Company Name columns stay in view and the remaining columns are scrolled into view from right to left.
Manage Email Template screen with Email Templates List
Email Templates List (composite graphic showing all grid columns)
Viewing an Email Template
To View an Email Template:
-
Open the Admin | Manage Email Template screen:
-
Mouse-over the Admin menu tab to display the Admin menu and then click the menu’s Manage Email Template item.
-
OR
-
Open the Admin screen by clicking the Admin menu tab and then click the screen’s Manage Email Template link.
The system displays the Manage Email Template screen and Email Templates List.
-
Use the screen’s Email Templates List grid to locate the template that you want to view.
Use the grid’s Search fields, scroll bars, and page controls to navigate through the list as needed.
-
Click the template’s row within the Email Templates List to select it.
Once selected, the grid row containing the selected account is highlighted.
-
Click the row’s View button, located in the Action column.
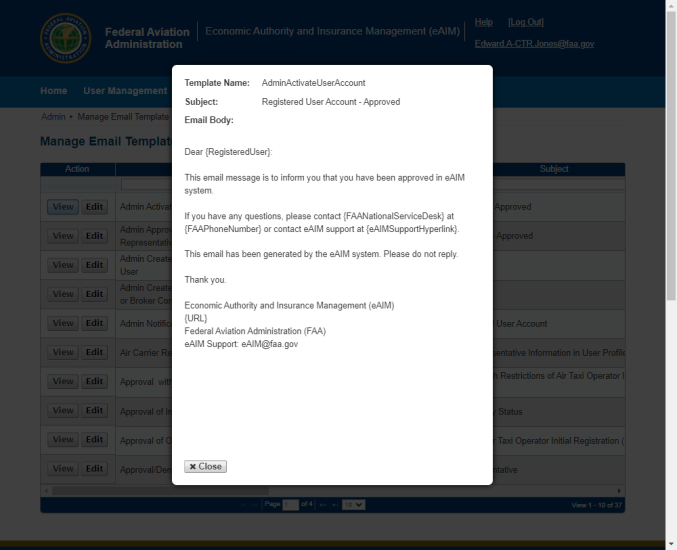
The system presents the View Email Template display in front of the Manage Email Template screen, which is displayed with gray formatting. The View Email Template display resembles a dialog box and is displayed in the center of the window. The system renders the template’s HTML content and attributes, and displays the message as it will appear on a screen or in an email window.
-
Review the email template’s attributes as needed using the View Email Template display
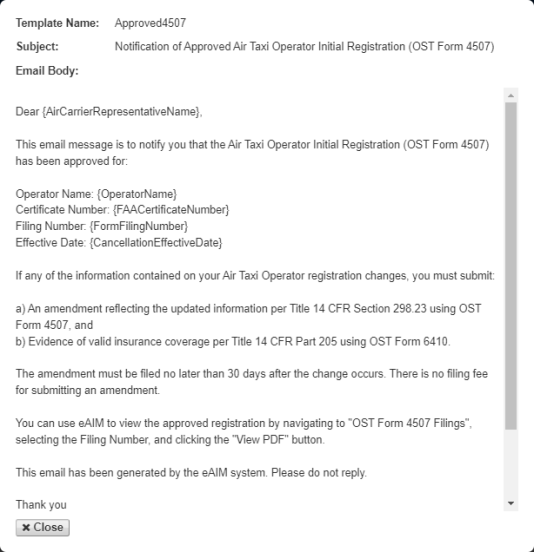
For longer messages, the View Email Template display will include a vertical scroll bar along the right side of the display area.
The View Email Template display includes the following content:
Template Name: The unique template name as stored within the system and represented on the Manage Email Template screen.
Subject: The text displayed in the email message’s subject area, the subject also serves as a short-form description and summarizes the primary topic of the message’s content. The Subject text is also displayed in the template’s Email Template List row.
Email Body: The majority of the display contains the body text of the email as it will appear in the received email message. The Email Body will also display the fields (i.e., tokens) that are used to tailor the message for each set of message recipients.
-
When you have finished using the display, click the Close button to close it and return to the Manage Email Template screen.
View Email Template display on Manage Email Template screen
View Email Template display with scroll bar
Editing an Email Template
To Edit an Email Template:
-
Open the Admin | Manage Email Template screen:
-
Mouse-over the Admin menu tab to display the Admin menu and then click the menu’s Manage Email Template item.
-
OR
-
Open the Admin screen by clicking the Admin menu tab and then click the screen’s Manage Email Template link.
The system displays the Manage Email Template screen and Email Templates List.
-
Use the screen’s Email Templates List grid to locate the template that you want to view.
Use the grid’s Search fields, scroll bars, and page controls to navigate through the list as needed.
-
Click the template’s row within the Email Templates List to select it.
Once selected, the grid row containing the selected account is highlighted.
-
Click the row’s Edit button, located in the Action column.
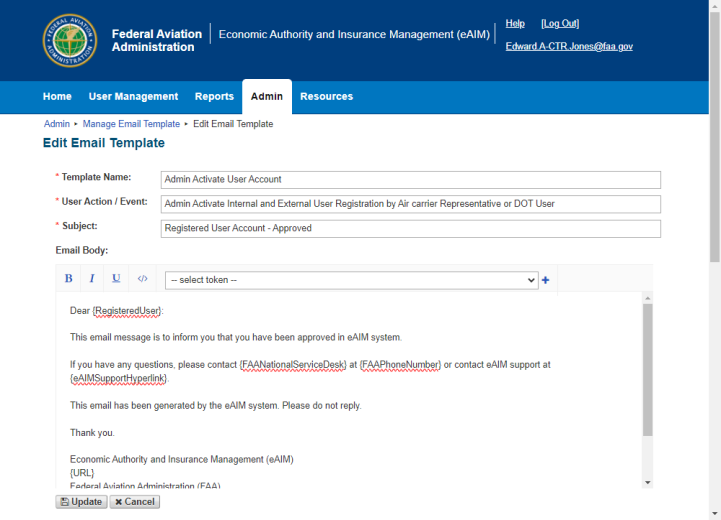
The system displays the Edit Email Template screen in the current browser window. The Edit Email Template screen presents data fields and controls for the selected email template, including the template’s attributes (Template Name, User Action/Event, and Subject) and Email Body content, which occupies the majority of the display area. On initial display, the system renders the template’s HTML content and attributes, and displays the message as it will appear in the generated email message on a screen or in an email window.
The large Email Body field occupies the majority of the screen. The Email Body field contains the HTML content of the email template, including the template’s base text and tokens (i.e., database fields) used by the system to generate the final email message as it will be sent to the recipient. When combined with the message’s base text, the tokens in the Email Body field allow the system to automatically tailor the message for each set of message recipients. The Email Body field displays a vertical scroll bar used to view longer templates, and, when in HTML display mode, a horizontal scroll bar. The field includes a toolbar displayed above the field’s area, and the Update and Cancel buttons displayed below the field at the bottom of the screen.
The toolbar can be used to (a) apply basic font formatting to entered text that is highlighted in the Email Body field; (c) select and insert a field (i.e., token) at the location of the cursor within the Email Body field, and; (b) switch to display of the Email Body field’s content as HTML (and then return to the default display).
Edit Email Template screen
Email Body field’s toolbar with Text Formatting buttons, Show HTML code button, Tokens list box, and Add Token button

-
Use the Edit Email Template screen’s template attribute fields to edit the email template’s elements.
The screen includes the following template attribute fields (Required fields are marked using a red asterisk placed next to the field/control label):
Template Name: Template Name*: The unique template name as stored within the system and represented on the Manage Email Template screen. Template Name is also displayed in the template’s Email Template List row.
User Action/Event*: Text describing the system-initiated user action or event that triggers generation of the automated email message (capturing the message’s purpose). This text often includes specific eAIM user roles and user actions and may also indicate specific workflow actions. User Action/Event is also displayed in the template’s Email Template List row.
Subject*: The text displayed in the email message’s subject area. The subject also serves as a short-form description and summarizes the primary topic of the message’s content. The Subject text is also displayed in the template’s Email Template List row.
-
Use the Edit Email Template screen’s Email Body field and the toolbar controls to edit the email template’s body content.
Email Body field: Although displayed as plain text by default, this field contains the message’s text (as HTML) and the tokens used by the system to automatically generate email messages that are tailored for recipients.
Use the vertical scroll bar as needed to view all of the email body for templates having large amounts of text/content.
Note: When text is displayed in the field, you can edit the characters and format the text and paragraphs using HTML tags (see Step 6c below), or you can type or edit text, highlight the text, and use the toolbar’s Text Formatting buttons to apply font formatting to the text
-
Edit and/or type text that will form the message’s base text and apply text formatting as needed to meet the email message template’s purpose and requirements.
-
Type and edit the Email Body field text.
-
To apply formatting to Email Body field text:
-
Highlight the text in the Email Body field.
-
Text Formatting toolbar buttons: Use the toolbar displayed above the field’s display area to apply basic font formatting to entered text that is highlighted in the Email Body field: Click the toolbar buttons to apply text formatting attributes to the highlighted text as follows (Note: You can combine text formatting for highlighted text):
Bold (
 ): Applies strong or thick character formatting to selected words and spaces.
Italic (
 ): Applies slanted character formatting to selected words and spaces.
Underline (
 ): Applies an underscore to selected words and spaces.
Token list box
-
-
-
Add or remove tokens within the Email Body field as needed to meet the email message template’s purpose and requirements.
-
To add a token:
-
Place the cursor within the Email Body field at the desired location (relative to other text).
-
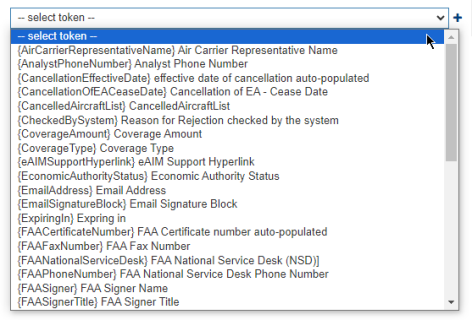
Use the toolbar’s Token list box to select a token:
Tokens list box: Allows the user to select a token that will be used as a field within the Email Body when the user follows token selection with a click of the Add Token button (
 ) button. By default, the list box displays the text “-- select token --”. Valid Token values (and descriptions) include:
{AirCarrierRepresentativeName} Air Carrier Representative Name
{AnalystPhoneNumber} Analyst Phone Number
{CancellationEffectiveDate} Effective Date of Cancellation auto-populated
{CancellationOfEACeaseDate} Cancellation of EA - Cease Date
{CancelledAircraftList} CancelledAircraftList
{CheckedBySystem} Reason for Rejection checked by the system
{CoverageAmount} Coverage Amount
{CoverageType} Coverage Type
{eAIMSupportHyperlink} eAIM Support Hyperlink
{EconomicAuthorityStatus} Economic Authority Status
{EmailAddress} Email Address
{EmailSignatureBlock} Email Signature Block
{ExpiringIn} Expiring in
{FAACertificateNumber} FAA Certificate Number auto-populated
{FAAFaxNumber} FAA Fax Number
{FAANationalServiceDesk} FAA National Service Desk (NSD)
{FAAPhoneNumber} FAA National Service Desk Phone Number
{FAASigner} FAA Signer Name
{FAASignerTitle} FAA Signer Title
{Form6410Or6411} Form Number
{FormFilingNumber} Form Filing Number
{InsuranceBrokerName} Insurance Broker Name
{InsurancePolicyNumber} Insurance Policy Number
{InsuranceRepresentativeName} Insurance Company Representative Name
{InsuranceRepresentativeOrBrokerName} Insurance Company Representative or Broker
{ListOfInsuranceCompany} List of Insurance Companies
{NameofUserAccountRepresentative} Name of User Account Representative
{OperatorDesignatorCode} Operator Designator Code auto-populated
{OperatorName} Operator Name
{Option1} Option 1
{Option2} Option 2
{Option3} Option 3
{OrganizationTitle} Organization Title
{PasswordResetTokenExpireIn} Password Reset Token Expiring in
{PayGovLink} Pay.gov ACT Form URL
{PopulatedBySystem} Reason for Restriction populated by system
{RegisteredUser} Registered User Account
{RejectedAircraftRegistrationNumberList} List of Rejected Aircraft Registration Numbers
{RoleName} Role Name
{TemporaryPassword} Temporary password
{URL} URL
{URLToken} Token
-
Click the Add Token button (
 ) to add the selected token as a database field within the Email Body field at the cursor’s current location.
 The token is inserted at the cursor’s current location within the Email Body field.
-
-
Repeat the process for each token needed for the email template.
-
-
Edit text character and paragraph formatting using HTML tags: You can use the Show HTML code button to place the Edit Body field in HTML mode, at which point you can type text and insert HTML tags to apply specific formatting (such as bulleted or number list):
-
Click the Show HTML code button (
 ) to place the Email Body field’s content in the HTML display mode.
 Note: The Show HTML code button toggles the Email Body field to display the template body as HTML or plain text.
Email Body field in HTML display mode (using Show HTML code button)
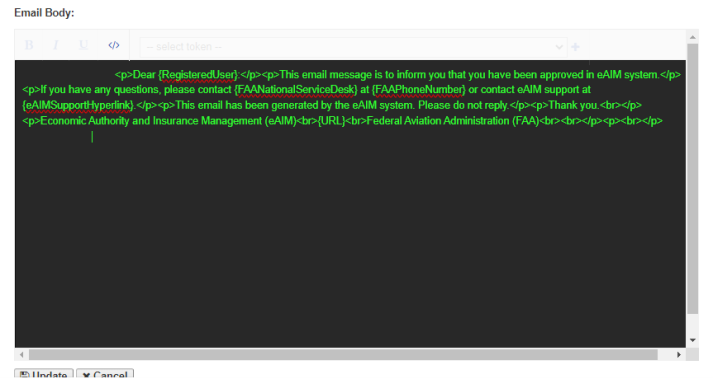
The system places the Edit Body field in HTML mode, displaying the field’s characters in green text on a black background.
-
Type text and insert HTML tags as needed to apply specific formatting for the field contents.
To return to the plain text display of Email Body field’s contents, click the Show HTML code button again.
-
-
-
To retain edits that you have made to the template’s attributes and/or body content, click the Update button, located at the bottom of the screen (OR click the Cancel button to abort the process).
The system returns to display of the Manage Email Template screen.